Hello everyone!
So! Let’s just get this out of the way. I am Canadian, and the way I spell ‘armor’ is armour. So, no, I am not spelling armour wrong.
You want to make cosplay armour, do you? Well, I hope you have patience and time because let me tell you, you’ll need to have every ounce of patience you can muster up, and you better start a couple months in advance especially if it’s your first time doing a piece of armour.
My first tip, before you start actually building anything is simple: find as many reference photos as you can for the armour set. Find pictures of every which side you can, if you are referencing a movie, play the movie and take pictures. Play the game and take screenshots or pictures as you are playing it. Do this for every source of media that you are building the armour from and find every angle. There is nothing worse than thinking you have everything you need and then realizing: hey you forgot this entire piece on the back, and then having no way to go back and edit it in without needing to redo the entire thing (or just give up and say that it’s not that important and it’ll be mostly covered up anyway so shh…)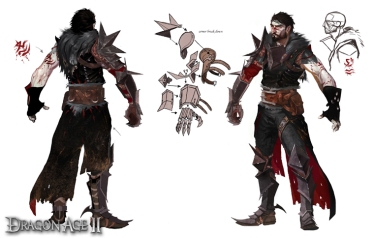
For my Hawke cosplay that I am currently working on, I used a couple different resource
s (you can check out here to see my progress on cosplays!). I found a blog on Tumblr that has game extractions from all of the dragon age games, and on it had a Marian Hawke 360 turn around and different side pictures of the character model. I also used the concept art of Garrett Hawke, since the two armours are identical.
Now all you need to do is gather the materials! You can find numerous other blogs that suggest different materials and techniques, so I am just going to inform you of what I used, and if you think that you could find a simpler technique or material you can run off into the wild depths of the internet and then return and send me that info! I may have been cosplaying since 2008 but that doesn’t mean I know everything.
Now, I am going to make a list of everything that we have used for our cosplays (and how much we got it for). Then I will list off what each material is used for. Just so it is more organized and you can get the gist of it all without being too overwhelmed. (I’ll be posting a tutorial when I have finished my chest piece for Hawke)
- Warbla – 3 small sheets 19’x29′ = $75.71 CAD (Discounted due to the fact they didn’t have any large sheets available at the time. Got an extra 18’x28′ for 30 cheaper than the large sheets woo!) My sister got a large sheet which is 39’x59′ for about 90 some dollars.
- Craft foam (12 sheets) – $8.97 CAD
- EVA foam (package of 4) = $13.97 CAD
- Metallic gold spray paint – $8.97 CAD
- Metallic silver spray paint – $8.97 CAD
- Wood glue 400ml – $9.57 CAD
- Hot glue gun (already owned)
- Glue sticks (already owned)
- Paintbrush (already owned)
- Black acrylic paint (already owned)
- Heat gun (already owned)
Since this post is fairly long below, I am putting in a read more!
Warbla
What is it?
A thermoplastic material that when heated will go from a stiff hard material to a flexible, soft, and slightly sticky material that you can then mould to a certain shape. When it cools, it will return to it’s stiff and hard form.
What is it used for?
Warbla will be used to give the craft foam more durability, and force it to stay in a certain shape. It also allows for easier painting of the armour piece. You can also use it to add details on that bump out from the armour piece! This will only go on top of the craft foam, and not the EVA foam due to the density of the EVA foam.
We also used warbla by itself for things that needed the absolute thinnest material. For my Hawke cosplay, for example, I used it for the gauntlets, specifically, the fingers, and the back of the hand. Where I needed strength but not thickness.
Craft Foam
What is it?
Craft foam is exactly what you think it is. Thin foam sheets that you can get basically everywhere.
What is it used for?
It will be used for the base of thinner pieces of armour. So gauntlets, vambraces, grieves, etc, etc! You will need to be exact with the templates at this stage, and depending on how much armour you have you might need a lot! Always buy more than you think you are going to need.
EVA Foam
What is it?
Remember those play mats from preschool and kindergarten? The ones that connect together? That is EVA foam. EVA is short for ethylene-vinyl acetate! Bit of science there for ya.
What is it used for?
This is used for thicker pieces of armour, so places like the chest plate, pauldron, knee armour (whatever that’s called haha). This will not be sandwiched with the warbla, due to the thickness and already durability of the foam! However, this foam is the least irritating one to work with due to the fact that you don’t need to use the warbla.
Spray/Acrylic Paint
What is it?
Paint…that you can spray…and acrylic paint!
What is it used for?
This will be used to give even coatings of paint onto the armour pieces. For more traditional pieces, metallic silver paint would be the best, for pieces that are funky colours, just use your imagination and your reference photos! You can also use traditional paint, but spray paint is faster to use and dries faster. (Make sure to pick up a spray paint that adheres to plastic or else you might be screwed!)
The acrylic will be used to weather the armour if you need to. You can also look up ways to use spray paint to weather, but using acrylic can help you put down the weathering where you want it and give you more control.
Wood Glue
What is it?
A glue that you use to glue wood pieces together.
What is it used for?
The wood glue is used as a sealant for all of the pieces of armour before you paint. It smooths out the surface of the foam or warbla to allow for even coating. I would recommend Gorilla glue since it dries mostly clear, water-resistant, and dries quickly. However, you can pick up whatever you want since you’ll be painting it anyways!
Hot Glue Gun + Glue sticks
What is it?
A gun that you use to heat up glue sticks to create a pretty strong connection between two items.
What is it used for?
You’ll be using this to glue pieces of armour together, straps onto the armour, and basically anything else you can think of! You can also attempt to make rivets for your armour out of a dollop of glue, but gluing on googly eyes will have the same effect.
Heat Gun
What is it?
A heat gun basically looks like a thin hairdryer. The difference is a heat gun can heat up way hotter than a hairdryer can.
What is it used for?
It is used for a few different reasons. The major? Heating up the warbla so it will mould around the foam and become sticky! The other? EVA foam has fairly large pores in it that makes it hard for the glue to stick to it, heating up the EVA foam will make the pores smaller and make it easier to apply glue and paint to it later down the road. It will also make the foam slightly more rigid!
That’s all! Now that you know all that you need, you can start thinking about the budget as well as the templates. The next tutorial will be how to make templates, for the armour you are making!
As always, stay safe, and give the follow button a click to keep up to date with my blog and all that is happening in my life!


Pingback: Making Cosplay Armour: Part 2 | Chibi's Channel